A Lock Miter Bit is one of the most challenging router bits to set up. You need to get both the fence position and the bit height exactly right in order for this joint to work. Once it does, it delivers a very strong and elegant miter joint that is virtually impossible to detect from the outside and offers the additional advantage of being self-aligning on glue-up.
There are many set-up helpers available, such as set-up blocks, but most, if not all of them, only work with perfectly dimensioned (generally ¾”) stock. If that is not the case, due to planing or sanding, those blocks are useless and the woodworker is left to figure it out on his own.
The set-up is dependent on stock thickness and, of course, the choice of router bit: each stock thickness requires a reset.
Although most woodworkers own at least one Lock Miter Bit, because of their frustrating set-up, most have given up on them. As a result, these bits end up in the collection of most expensive router bits: the ones that remain forever unused.
The GrooveCenter changes this situation dramatically.
It allows set-up of Lock Miter Bits perfectly accurately, and does so within minutes!
This “how to” demonstrates a set-up procedure for a big Lock Miter Bit (Freud #99-034), there’s another one for a typical small one (CMT #855-504.11).
 |
Let’s start with the big Freud. As usual, no need to measure the stock thickness. What is important, though, is that both halves of the joint are of identical thickness. Here two contrasting pieces of wood were used to enhance the show. |
In preparation for the actual set-up of the router (fence and bit height), we need to set the GrooveCenter for this particular Lock Miter Bit.
The trick will be to set the zero-position of the GrooveCenter exactly over the sweet spot of the Lock Miter Bit. This is called the “off-set” and the resulting number is “M” (M, the Magic Number).
 |
This is how M is calculated. What we are looking for, is the distance from the axis of the bit to the sweet spot. More information and a few calculation examples here. |
 |
According to the diagram, to determine the offset, we measure the distance F. In this case 1.900”. |
 |
Next we measure the smaller diameter: 1.500” (rounded off). Careful not to damage the cutters! |
 |
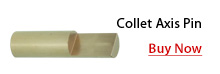
Following the formula in the diagram, M is equal to 0.850”. This is the distance the Collet Pin Plate needs to be extended away from the Zero Stop. Always check the GrooveCenter for Zero before use. Here you can see how to zero the tool. |
 |
The Collet Pin is placed into the router’s arbor. To start, we use a fence insert with just enough room for the Collet Pin Plate to pass. We’ll use another insert with a wider opening for the big router bit. |
 |
This insert opening is narrow enough for the Fence Pin to touch both sides for easy set-up with the work piece inserted in the GrooveCenter’s Carriage. |
 |
Having secured the fence in place, we remove the fence insert to chuck in the router bit. If there’s not enough room to tighten the router collet, mark the fence’s position very precisely with stop blocks before moving it out of the way! |
 |
The Freud is chucked in place, surrounded by an appropriate fence insert. A real zero-clearance insert is always better. |
 |
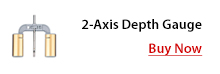
We know that the distance to the fence is perfect. We still need to determine the bit’s height. The 2-Axis Depth Gauge is a great help for this. Look here for more information. Thanks the rotating and offset feet, the Depth Gauge’s pin can “shoot” for exactly the right height and keep its setting when put aside. We register the distance to the fence from the small vertical finger… |
 |
…and, with the Depth Gauge in the vertical position, we adjust the bit’s height so that the pin is where shown: halfway that small end of the finger. That is a good starting point. “Identical” router bits have minute dimensional variations, you need to establish once and for all where exactly this vertical spot is (within a few ‘000”). |
 |
These router bits have to take off a huge amount of wood, so it is a good idea to prepare the stock by chamfering the edge. It makes lighter work for the router! |
 |
And with a perfect set up in a matter of minutes, here is the result! |
 |
Thanks to the contrasting wood the joint is visible. Yes, it’s that good! |
Related Articles